Showing posts with label home improvements. Show all posts

Tuesday, January 4, 2011

Imaginary Decorating

I'm still in the long, drawn out stages of planning a bathroom makeover. Here are a couple of things that caught my eye today...


Two of these Raindrop Sconces from Barn Light Electric on either side of a mirror? Sweet.


And this sink & console are quite adorable & just the kind of look I'd love. Unfortunately, they are also out of my price range. But it gives me ideas to work from.

Maybe not these things together, but hey, I've got two ugly bathroom so it's good to bookmark lots of things.

Saturday, October 23, 2010

Kitchen :: Before

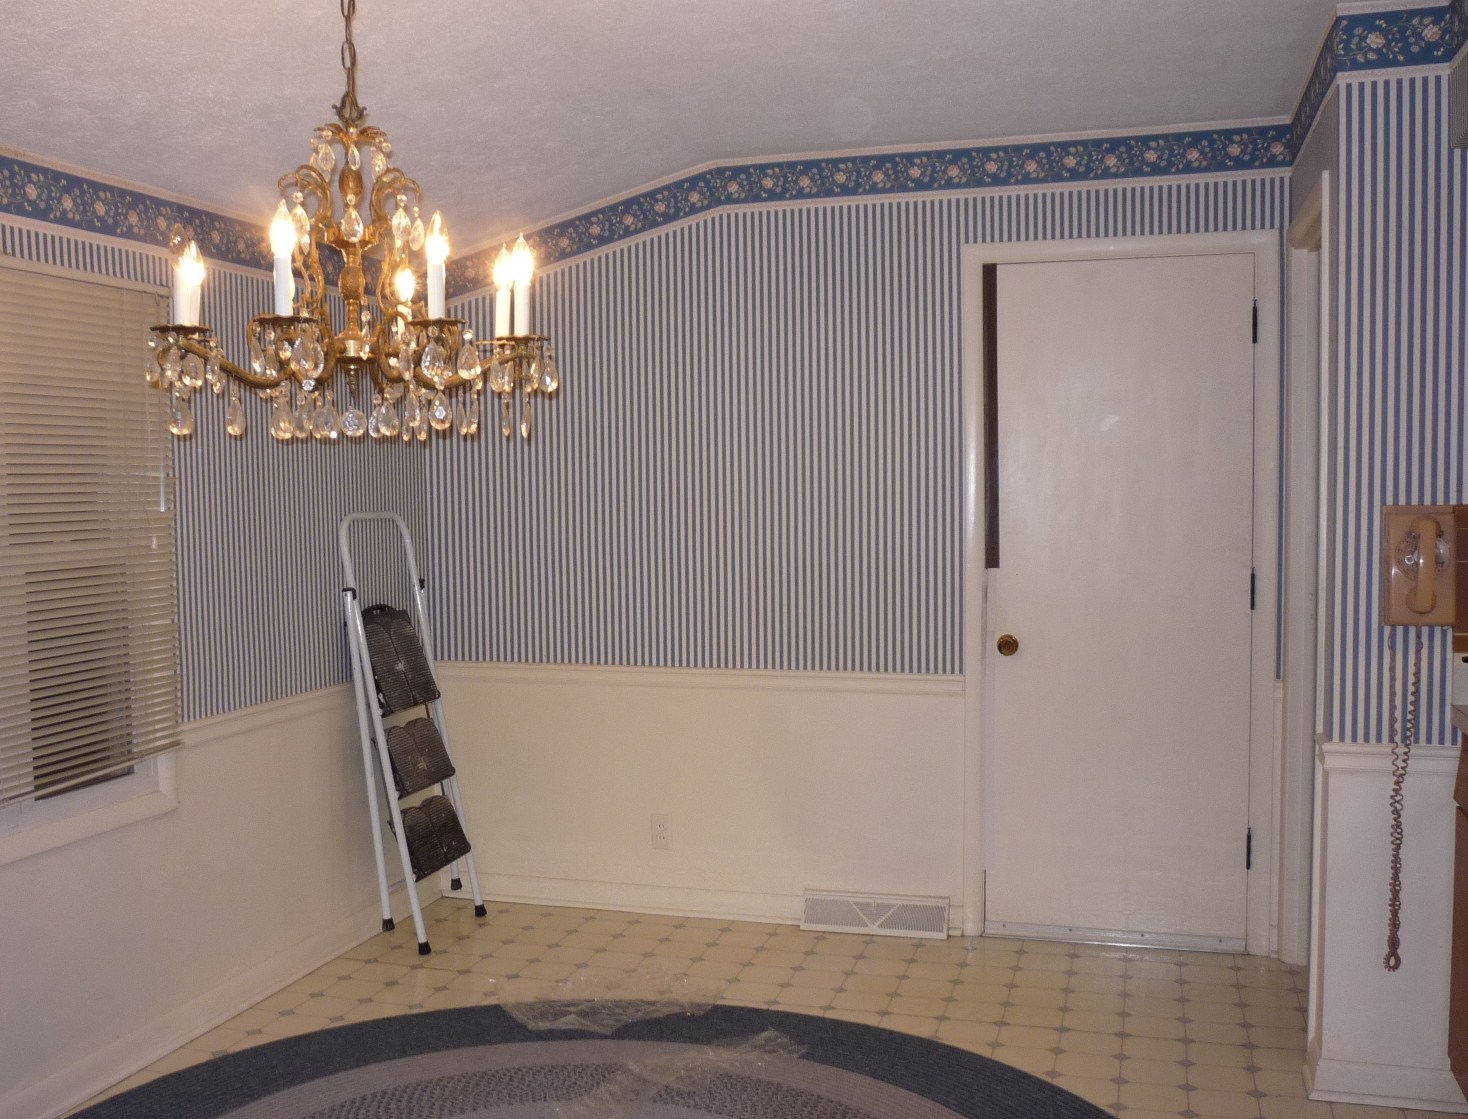
My kitchen is not finished. Not even close. I just finished priming the walls & have not even started on the cabinets. And this is just phase 1. Phase 2 will come at a later date (and probably not even the same time, so Phase 2 & 3) & will include new floors, counters, backsplash, sink & faucet. But I thought it would be fun to look back at what was here when I bought the house... so here we go:


Wooooo! Look at that wallpaper (+ border)! This is the dining area of the eat-in kitchen... check out that chandelier! Fancy. Nothing says 1959 ranch like a chandelier w/a pineapple center! Also... biggest phone ever. And that weird black strip on the door? That's weather-stripping done wrong.


I noticed all my photos are from this side of the kitchen (ha)... here you can see the back door, the doorway to the living room (check out those curtains... hot!), where the fridge goes, the counter stovetop, & the some of the cabinets. And the off-white counter (yuck). Oh, and see that chair rail? Yeah, they just put it up & painted over the wallpaper. That was a fun discovery.


More cabinets, they're in good shape. I like that they have flat doors. But I'm not a fan of that orange wood. You can also kinda see the sink/faucet although they blend in very well w/the counters as they are the exact same color. The composite granite sink sucks. And there's the backsplash... peach w/a brown border. Ugh.


Pretty much the same view though you can see the wall oven off to the left. And there's a great view of the floor. Not the most horrible thing I've ever seen, just not my style.

So, there you have an idea of where I started... the house is a ranch built in 1959. It had one owner before me. Old man chic. Haha. It's a nice big space, tons of cabinets + a pantry (which I don't seem to have taken any before photos of). But it was really lacking in the pretty department. Like I said before, Phase 1 on the kitchen was removing the wallpaper & painting the walls plus painting the cabinets (white). But there are always surprises. In this case it was 3 layers of wallpaper over unfinished drywall, some of which was literally crumbling & being held together by the wallpaper. Took FOREVER to remove it all & then there was fixing drywall, skim coats, sanding, etc. Yeah, I have no patience or attention span so I stopped and started many times. But I'm determined to have Phase 1 done by the 1st anniversary of buying the house... and that's approaching fast.

Preview for visual types: the cabinets will be white, the kitchen walls pistachio green, & the dining area white. White trim, of course. I have a new light for the dining space & a killer plan for a table. No plan for the backsplash yet, but I'd really like either white corian or butcherblock counters, a slick stainless sink w/a faucet like this. And the floors? Thinking plywood, either painted or just sealed.

See? This look back was a good motivator to move forward... :D

Sunday, October 17, 2010

Weekend


Weekends go fast. Goyle spent most of the weekend throwing up. Ginger spent most of the weekend barking. I spent most of the weekend working on my kitchen.

Mudding. Sanding. Priming. Caulking. Etc.

Redid the drywall on a wall I was not happy with. Have a couple of other little things to touch up. Hoping to finish priming the newly fixed wall & around the edges early this week. Then PAINT. Finally.

And then it's on to the cabinets.

It's getting there.

Monday, August 9, 2010

Project Monday: Gate

I've decided to start highlighting some of my home projects (big & small) on my blog... Monday seemed like a good day since most of these things get done on weekends, right? So here is the first Project Monday: In which I make a wonky gate!


I mentioned previously that I was working on fencing in my backyard so the pups can roam free & stop tripping me. Well, after months (yes *months*) of working on this very simple u-post & welded wire fence, I'm in the home stretch. And this weekend was going to be it. I was going to finish the fence. This included the gate, a 4 foot section where I'd run out of fencing, & the patio area (which I'll talk about another day). Um... I got the gate done! Heh.

At first, I wasn't going to do a gate... this temporary* fence is only 3 feet high & I figured I could toss my reel mower over for yard work. But then I realized there might be other times & situations when I need to access the backyard, like the tons of dirt & stone I'll need delivered for my landscaping projects or for the gutter guy to come & fix my gutter waterfalls, etc. So I left this 4 foot section open until I could come up with a plan. I'm good at coming up with plans... not always very good at executing them. The first plan was to make the gate all wood. When I went to make that, I learned a couple of things:
  1. Wood is not the size it's sold as being. This is, I guess, common knowledge. Example - A 1"x4" is actually about 1"x3.5". Say what? This was very frustrating lesson to learn after I'd sketched out a plan & bought wood & put half of my gate together. Only to find my measurements were all wrong & I didn't have enough wood.
  2. Whatever kind of wood treated lumber is, it's HEAVY. I was using cedar for the front of the gate w/2"x4" treated lumber as the back. There's no way this gate would work on the "posts" I was planning.
So it was back to the drawing board... but at least I have a screen to hide my ugly A/C unit now, right? Plus side!

The gate design you see here is the gate I decided on... A cedar frame w/welded wire fencing sandwiched in the middle. The "posts" are also cedar. They're basically u-shaped covers around the u-posts that hold up the fencing. They are held on with hex bolts. Unfortunately, the original fence posts were not straight up & down and so the faux-posts are a little wonky. So wonky, in fact, that the gate doesn't line up right with one post. To fix this, I'll have to dig up the u-post & reset it & redo my post frame & blah blah blah... the gate works & I have other priorities. As long as I can latch it, it's good enough. For now. Whew, that was a long story about a gate.

*I want a "real" fence someday but it proved to be cost prohibitive this year w/the size of my yard. I used over 200 feet of welded wire fencing & that doesn't even count the patio area or where I'd like to extend the fence out on my side yard. This fence was easy enough that I could DIY it plus insanely cost effective at $3.00 a foot for ALL the supplies (that includes unexpected costs and many, many, many trips to Lowes/Depot). I'm saving my pennies for something prettier & permanent in the next 2-3 years. A wood fence will require posts set in concrete which will require labor costs plus an initial property survey... plus the fencing supplies themselves. When I estimated it out, it came out to 2-3K. Not in the budget, in other words.

Wednesday, July 28, 2010

Sinking Inspiration

I have 2 full bathrooms that need updated... I've got about a million ideas. As usual. And as usual, I have very little money to execute said ideas. It will probably be months before anything is started but I want to get all my ideas in one place. Best to think ahead, eh?

Both bathrooms are quite small & the current layouts leave much to be desired (like space, space is much desired). The first one I'm going to focus on is 8'x4.7' & blue. Blue sink, blue toilet, tiny blue tiled shower, blue speckled Formica vanity. Oh... and a hideous mirrored wall. And wallpaper. And ugly light fixture. And only a subfloor after I ripped up the nasty carpet (carpet in bathrooms = nasty. always. the end) And it has a door at each end. There is nothing I like about this bathroom.

First up on the idea gathering list: Sinks!

The current vanity is 30" wide x 22" deep. It is (did I mention this already?) UGLY. I think it takes up too much space for this size bathroom. So, here are a few ideas for the replacement... Let's start with something dreamy that I cannot afford!

This loverly sink is from DWR... it's currently 1/2 off and still a completely unaffordable (for moi) $655. But oh, she is pretty. About 24", built in towel rack, & wall-mounted to open up the cramped space a bit. (sigh) I just had to post this one to get it out of my system.

Moving on... other wall-mounted options: This option is from overstock & only $117. It's OK. This one is from IKEA and $160. It's super cute.

The next three are vessel sinks... This Kohler one caught my eye at Lowes... I believe it's about $150. Also Kohler, also Lowes... no idea on the price on this. Here's another one from Overstock. I love the rectangular shape of this one.

That may be it for tonight... I will probably do another sink post before I put my final idea together. This is a good start though.